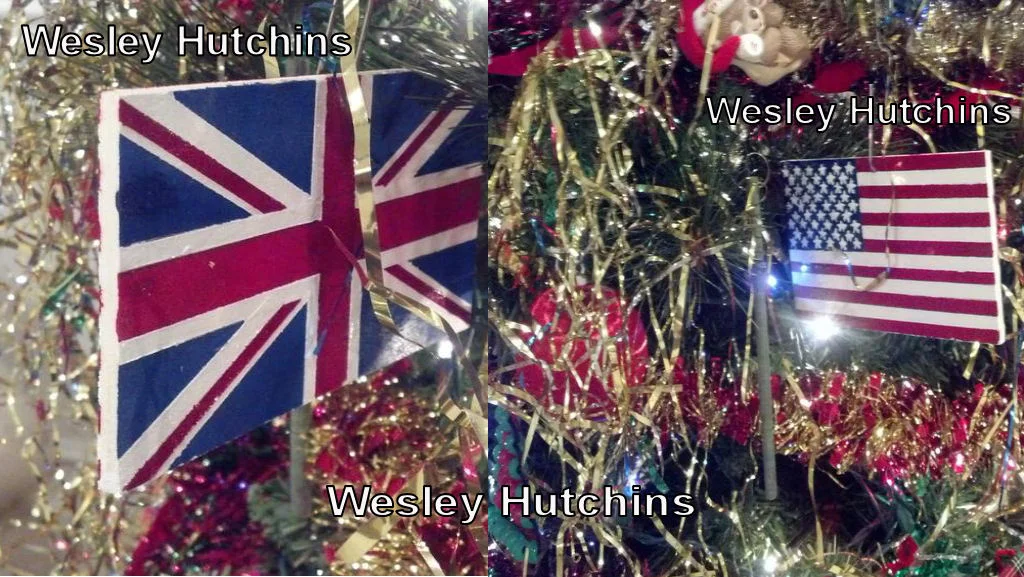
Two Flags, One Special Christmas Ornament
/As Christmas approached last year, I searched the web to find a suitable ornament featuring the Union Flag and Stars and Stripes (or some kind of US-UK symbol) for our Christmas tree, and though there were some good selections from which to choose, they were either too expensive or not what I was really look for…or both.
While at my job (and with time running short till Christmas), I began thinking about making my own ornament and took some time thinking about its size, materials, and feasibility as something that I could do on my own.
From an arts and crafts store, I purchased a set of thin balsa wood slabs, glossy model paint for three colors (red, white, and blue), paint brushes, and enamel thinner/brush cleaner. Also purchased was a tool kit with a wood cutter and a small hand drill bit for drilling a hole for the ornament hook.
Even then, and later when I got home, I had no real plan for making the ornament. There was only the most general of ideas of how to do it, and I more-or-less figured things out as I went along.
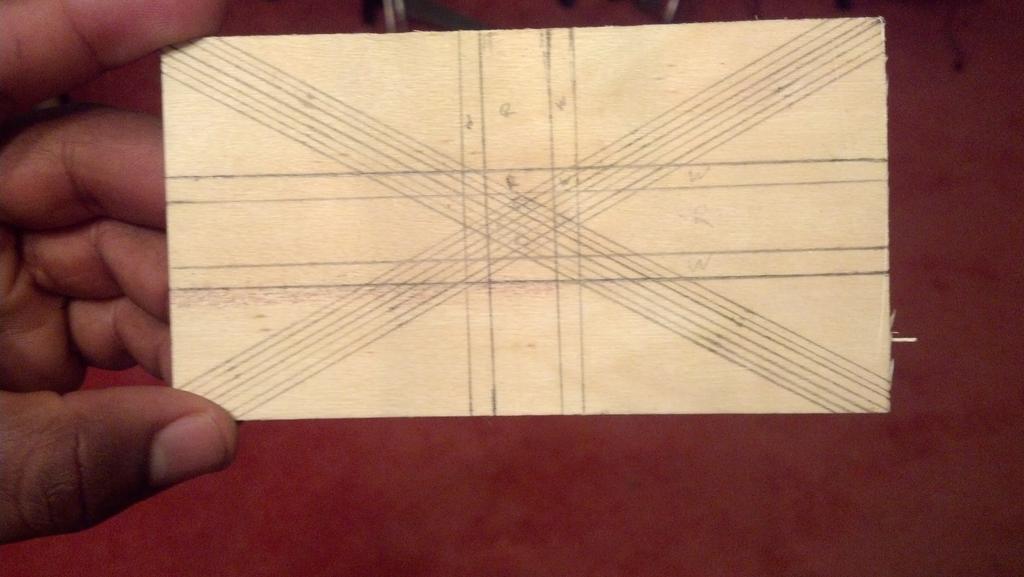
First, I researched to find the correct dimensions of the Union Flag, including the measurements for each of the three crosses contained within the flag for St. Andrew, St. George, and St. Patrick – the patron saints of Scotland, England, and Ireland respectively. These were scaled down proportionally to the size of the balsa wood slabs, with their short side used a reference point. The long side being too long for the project, it was cut to size on one of the slabs.
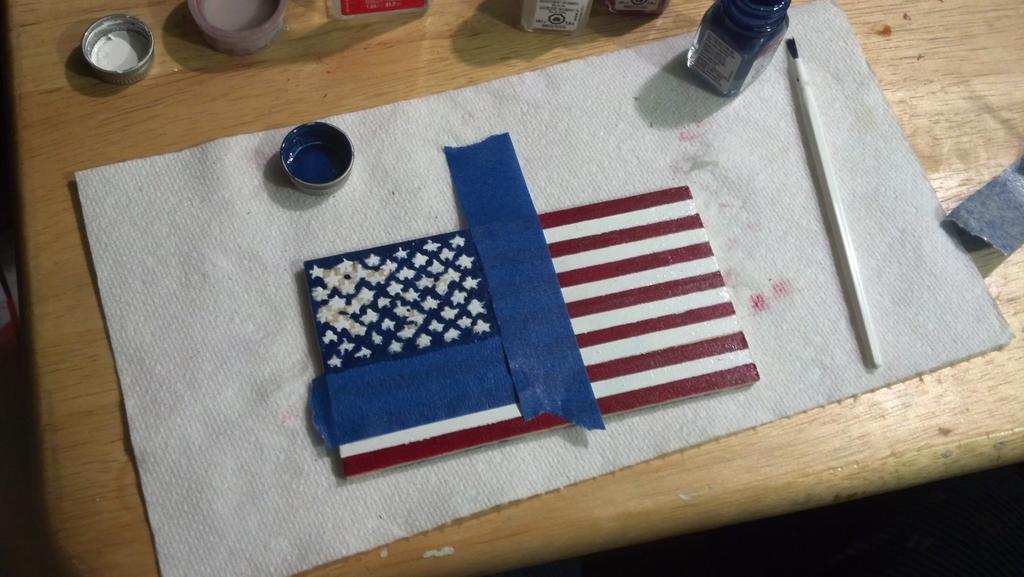
With the dimensions accounted for and the slab properly sized, I drew the outlines for the respective colors of the flag so that the painting could be done properly and an as cleanly as possible. For extra security, it was decided to use painter’s tape – a form of masking tape – to cover over the areas not being painted at a particular time and thereby ensure a smoother and less messy job.
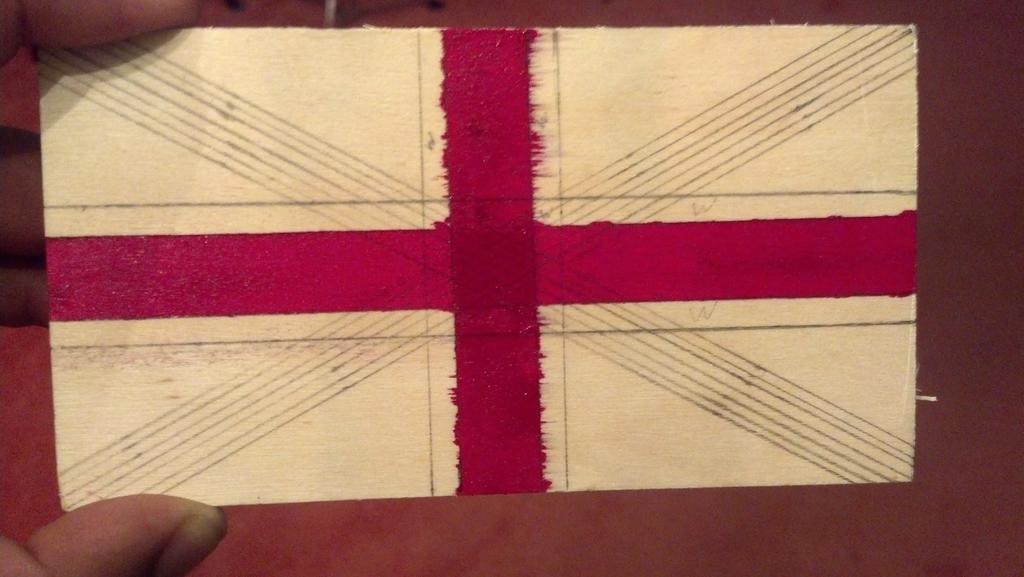
The project got properly underway with the painting of St. George’s Cross using glossy red model paint.
After I had allowed this to dry for a few minutes, it was followed by the painting of the blue field derived from Scotland’s flag. This was done in stages in accordance to the placement of the painter’s tape, and to speed up the progress, I painted in two areas at once – usually in the opposite quadrant from each other after the paint had dried in the other quadrants.
The final bit of progress made on that first day of the project was the painting of the white border (or fimbriation) around St. George’s Cross, which is derived from the English flag and divides it from the blue field. For this, several pieces of tape were used to prevent the white paint from bleeding over into the other colors, and with white being a light color, these areas required several coats of it to fully cover the vanilla of the balsa wood. After completion, this was left overnight to dry.

On the next day, I further touched up on the white paint from the previous night, and after I was satisfied, I removed the tape to reveal the Union Flag taking shape quite nicely on the balsa wood.

Now it was time to work on the diagonal crosses – or saltire’s – of St. Andrew and St. Patrick, which are “counterchanged” so that the position given to the white St. Andrew’s Saltire in one quadrant is the same as that given to the red St. Patrick’s Saltire in the diagonally opposite quadrant. This counterchanging, or pinwheeling effect means that the UK flag is not symmetrical, and is therefore the reason why the flag cannot be flown or drawn in just any way which does not respect the correct positioning of the two crosses.
Since Scotland – along with England (and Wales) – became part of the Union at its inception on May 1, 1707 and Ireland did not join until nearly a century later, St. Andrew’s Saltire is placed uppermost in the northwest quadrant near the flagstaff, which is also known as the hoist end of the flag and considered the most honorable position in heraldry. St. Patrick’s Saltire received the second most honorable position – being uppermost in the northeast quadrant, the fly end of the flag. St. Andrew's Saltire leads this pinwheeling in the clockwise direction
For this project, six spaces were created between the lines in each diagonal of the flag in accordance to the actual dimensions of a standard flag. In each diagonal, four of the spaces are painted white and two are painted red, with the result that the two crosses sit side-by-side along the center lines of the diagonals and a fimbriation is formed to prevent St. Patrick’s Saltire from touching the blue field.
So first, I painted the three white spaces which form St. Andrew’s Saltire in each quadrant, and after several coats, it was left to dry for much of the day until I returned to remove the tape.


Then I proceeded to paint the fourth white space, and following several applications of the color, it too was left to dry for several hours.

Upon the removal of the painter’s tape from here, St. Andrew’s Saltire and the fimbriations around it were complete.
Now came the time to paint St. Patrick’s Saltire of Northern Ireland into the remaining space within the diagonals. This was left overnight to dry.

Upon the beginning of day three, a final coat of red was applied to St. Patrick’s Saltire and the tape was peeled away to reveal a finished Union Flag!

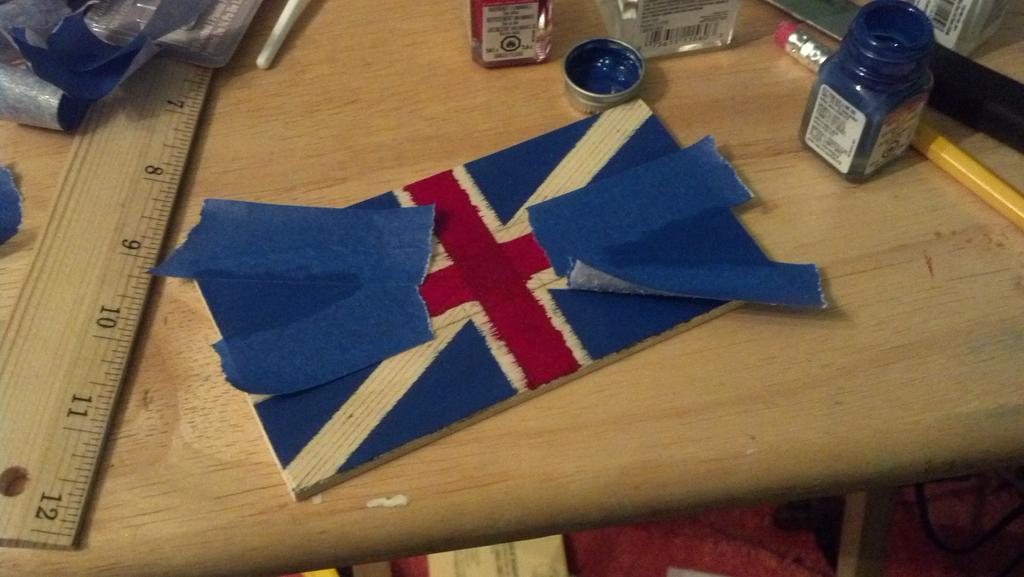
With this half of the project completed, I moved on to the Stars and Stripes.
As with the Union Jack, I started work on my country’s flag by researching to find the correct dimensions – including the measurements for the thirteen stripes, the blue canton in the upper left corner, and the fifty stars within the canton. With the measurements being accounted for, they were scaled down proportionally to fit the size of the balsa wood slab, and with this completed, the real work could begin.
First came the drawing of the stripes, followed by the upper left canton.

Paintwork was then commenced on the stripes representing the thirteen British colonies which became the first states in the Union in 1776. The red stripes were painted first – with the first, third, fifth, and seventh stripes being painted before the second, fourth, and sixth due to the constraints via the painter’s tape. Upon completion and drying out, the tape was removed to reveal seven near-perfect red stripes.


Now it was time for painting the white stripes, which were done a bit more quickly because I had found a way to sufficiently cover the whole of all of the red stripes as I painted the white ones between them. After several coats, this was left overnight to dry.

On the next morning, day 4 began with the unpeeling of the painter’s tape to show the completed thirteen stripes. Following this was probably the hardest part of the whole project: the fifty stars representing the fifty states of the Union today against the upper left blue canton.
The stars themselves would be quite tiny and required precise locations in order to make the overall flag look right. To this end, I drew lines down and across the canton in reflection of the measurements on an actual flag, and once this was right, I drew in dots at the relevant intersections as placeholders for the stars. As one can see, there was a significant amount of erasing going on as I worked to get the placement as accurate as possible.

Next, I proceeded to paint the fifty white stars. With no realistic way of trying to paint through a cut-out of the stars or anything of that sort, I resorted to painting them one by one with varying degrees of success to say the least.

Following this was painting the blue canton around those stars. This proved quite tricky since I was trying to negotiate around the stars that were already painted, and as it was, I did mess up on some of the stars, but pressed on with the painting.


After allowing this to dry overnight, day 5 opened with the retouching of the stars that had been damaged by the blue paint. What ended up happening was a back and forth battle between getting white stars and the blue field as accurate as possible. This alone took a whole day to do because in some cases, I had to allow one paint to dry before using the other paint, lest the colors mixed and created a bigger mess!
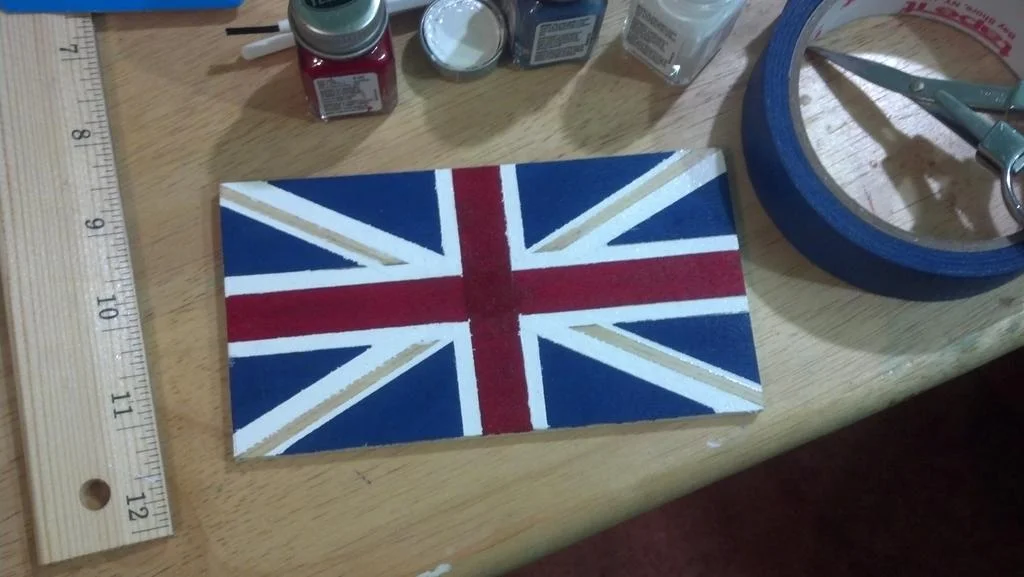
Finally on the sixth day, the project was complete. The hand drill bit was used to drill a hole at the top in order to place an ornament hook through it, and a spot on our family Christmas tree was found for the newest addition among its decorations!
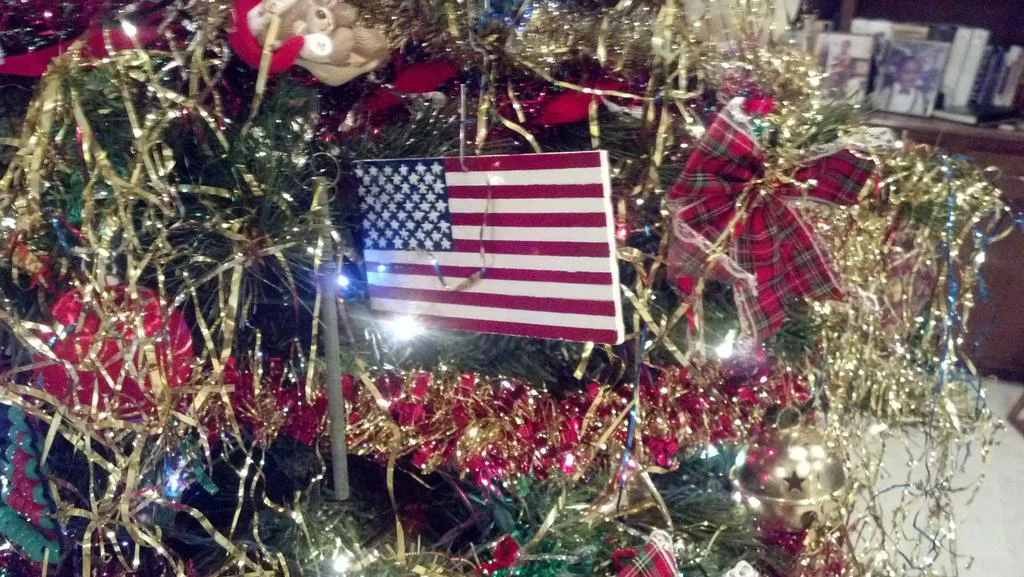

One year later, and I must say that I am still very much proud of producing this special ornament which celebrates the Special Relationship between the United States and the United Kingdom. It beautifully graces our tree in a position where both sides are prominently featured and can be appreciated for being a work of art and craftsmanship. Indeed, it shows what can be done when a person puts their mind (and patience) to it.
During the Christmas season, I hope that all of us will certainly have a mind for being with our families, giving to others, and counting our blessings. It’s unique time for joy and celebration under any flag, and we’ll do well to remember the importance of striving towards “peace on earth and goodwill toward men.”
Merry Christmas!